
Long Arm Toy Escape Bar Tier List
Standard is free. Gold is the value pick. Diamond and Steampunk are comfort.
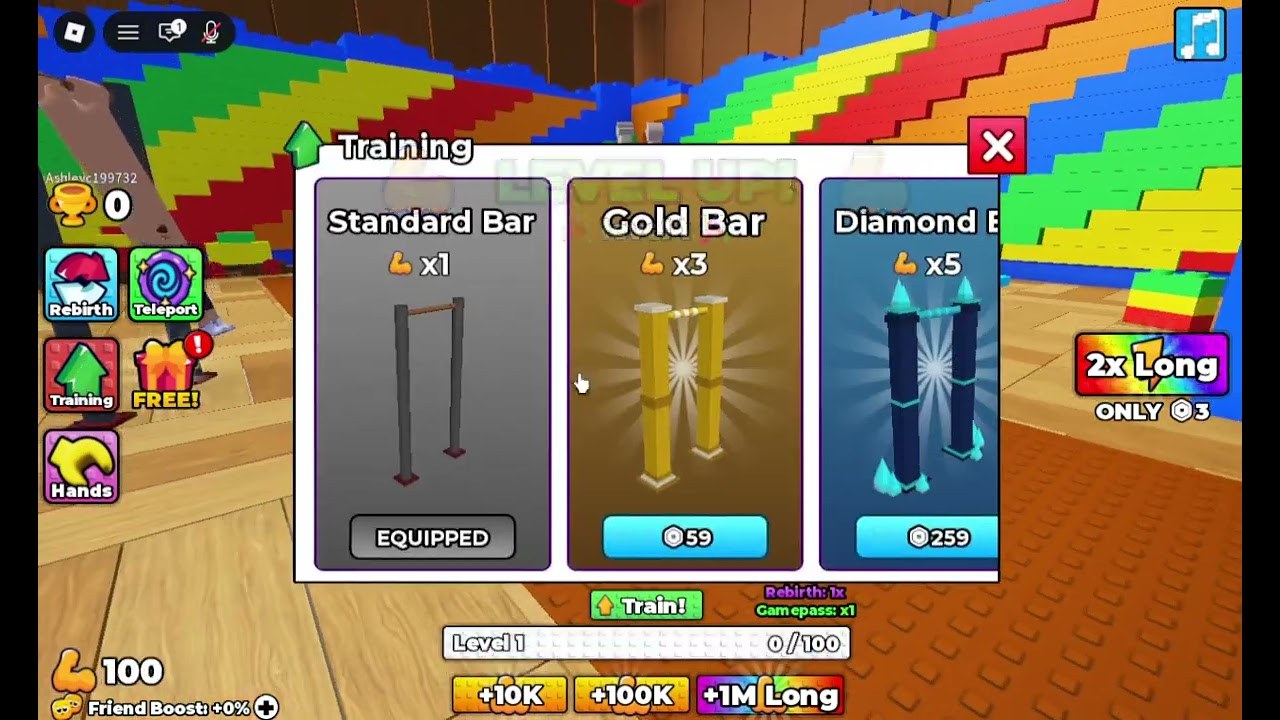
Bars are the training tools in +1 Long Arm Toy Escape. They are not walkways in the factory — the world has those too — they are the three (now four) options inside the Training shop. Each one multiplies Train!. Picking wrong does not brick your file, but 449 Robux on a spinner you do not understand is a bad first spend.
Open Training from the left rail. You will see cards with a preview, a flex multiplier, and a price. Equipped bars show a grey Equipped tag. Paid bars show a Robux button.
Ranked list
S — Gold Bar (59 Robux, x3)
Gold is the only bar that changes the feel of the game for almost everyone who likes the loop. Triple Train! speed at a snack price. Buy it after one honest session on Standard, not before you know how grabs work. If you only ever buy one thing, buy this.
A — Diamond Bar (259 Robux, x5)
Five times Standard. It is better than Gold and not five times the price-to-fun. Get it when Gold already feels slow and you are still playing after a rebirth. Skipping Gold and jumping to Diamond is fine if 259 is cheap to you; most players should not.
B — Standard Bar (free, x1)
S-tier for your wallet, B-tier for rate. It is equipped on join. You can escape the toy factory on Standard if you accept a longer train. Never sell yourself the story that the map is paywalled. It is gated by minutes.
B — Steampunk Spinning Bar (449 Robux)
Added 26 August 2026, twelve days after launch. Expensive, themed, and spinning. Treat it as a specialty / flex piece until you already own Gold (and probably Diamond). A moving bar you have not practiced on is a worse trainer than a still Gold frame. If you main it, practice tracking in the lobby the same way you track world spinners.
Unranked as a “bar” — Diamond Hands (299 Robux)
Hands is a different left-rail shop. People confuse it with Diamond Bar because both say Diamond. Rank Hands on the gamepass list, not here.
Price per multiplier (rough)
| Bar | Mult | Robux | Robux per extra x |
|---|---|---|---|
| Standard | x1 | 0 | — |
| Gold | x3 | 59 | ~30 per extra x |
| Diamond | x5 | 259 | ~65 per extra x from Standard |
| Steampunk | specialty | 449 | luxury |
Gold wins the spreadsheet. Diamond wins if your time is expensive. Steampunk wins if you like the look and already finished the value picks. Pair this table with the tools price guide when a timed 2x Long offer is also on screen — do not buy two rate boosts in the same minute without a plan.
How to equip and not brick a run
Equip from Training before a factory attempt. Switching mid-gap is how you open a shop over water. After a rebirth, confirm the bar is still equipped; UI can drop back to Standard visually even when you own Gold.
What bars do not do
They do not auto-aim. They do not skip sharks. They do not replace codes or Friend Boost. They make the clicker faster so you reach the next honest grab sooner. If your deaths are aim deaths, spend time in controls, not Robux.
Long Armers can add more frames. When a new card appears in Training, we will slot it on this list and mention it in updates. Until then, Gold is the answer people do not want because it is boring and correct.
Frequently Asked Questions
Quick answers to the most common questions.
Is Standard Bar good enough?
Yes. It is x1 and free. Expect a longer train before each factory gap.
Gold or Diamond first?
Gold. Diamond is a later comfort buy.
Is Steampunk required?
No. It is a 449 Robux specialty bar added 26 August 2026.
Why is Diamond Hands not on this list?
It is a Hands shop item. See the gamepass tier list.